When it comes to updating your bathroom, one of the quickest and easiest ways to give it a fresh new look is by using stick-on tiles. These self-adhesive tiles are a game-changer for those who want to revamp their bathroom without the hassle of a complete renovation. Stick-on tiles are not only affordable and easy to install, but they also come in a wide variety of designs and styles, allowing you to create a customized look that suits your personal taste. In this article, we’ll explore the benefits of stick-on tiles and how they can transform your bathroom into a stylish oasis.
Why Choose Stick-On Tiles?
Stick-on tiles are a practical choice for updating your bathroom for several reasons:
- Easy Installation: Unlike traditional tiles that require grout and professional installation, stick-on tiles can be easily applied by anyone. Simply peel off the backing and stick them onto your bathroom walls or floors. It’s a simple DIY project that can be completed in a matter of hours.
- Affordability: Renovating a bathroom can be expensive, but stick-on tiles offer a cost-effective alternative. With a fraction of the price of traditional tiles, you can achieve a high-end look without breaking the bank.
- Variety of Designs: Stick-on tiles come in a wide range of designs, colors, and patterns, allowing you to unleash your creativity and personalize your bathroom. Whether you prefer a classic, modern, or eclectic style, there’s a stick-on tile that suits your taste.
- Easy Maintenance: Stick-on tiles are not only easy to install but also easy to maintain. They are resistant to moisture, making them perfect for bathrooms where humidity is a concern. Cleaning stick-on tiles is a breeze – simply wipe them with a damp cloth or mild cleanser.
Transform Your Bathroom with Stick-On Tiles
Stick-on tiles can instantly transform the look and feel of your bathroom. Here are a few ideas to get you inspired:
1. Create a Subway Tile Backsplash
Subway tiles are a timeless choice for bathrooms. With stick-on subway tiles, you can create a stunning backsplash behind your vanity or bathtub. Opt for classic white tiles for a clean and sophisticated look or experiment with colored tiles for a more vibrant and eclectic vibe.

2. Add a Pop of Color with Mosaic Tiles
Mosaic tiles are a versatile option that can add a pop of color and texture to your bathroom. Stick-on mosaic tiles come in various shapes and sizes, allowing you to create intricate patterns or eye-catching focal points. Whether you want to jazz up your shower area or create an accent wall, mosaic tiles can do the trick.

3. Embrace the Natural Look with Stone Tiles
If you love the look of natural stone but don’t want the hassle of real stone tiles, stick-on stone tiles are a fantastic alternative. They can mimic the appearance of marble, granite, or pebble stones, giving your bathroom an elegant and organic touch. Stone tiles are perfect for creating a spa-like atmosphere in your bathroom.
4. Experiment with Patterns and Textures
Stick-on tiles offer endless possibilities when it comes to patterns and textures. From geometric patterns to 3D textures, you can mix and match different tiles to create a unique and visually appealing bathroom. Don’t be afraid to play with different colors and styles to create a one-of-a-kind space.
5. Update Your Shower Area
Tired of your plain shower walls? Stick-on tiles can instantly upgrade your shower area. Whether you want a sleek and modern look or a rustic and earthy vibe, there’s a stick-on tile that can transform your shower into a stylish oasis. Say goodbye to boring shower walls and hello to a refreshing new look.
Frequently Asked Questions about Stick-On Tiles and Bathrooms
Question: Are stick-on tiles waterproof?
Answer: Yes, stick-on tiles are designed to be waterproof and resistant to moisture. They are a perfect choice for bathrooms where humidity and water exposure are common.
Question: Can stick-on tiles be used in showers?
Answer: While stick-on tiles are waterproof, they may not be suitable for direct and constant water exposure, such as the inside of a shower. It’s best to consult the manufacturer’s guidelines to determine if the stick-on tiles you choose are suitable for shower use.
Question: Are stick-on tiles easy to remove?
Answer: Yes, stick-on tiles are generally easy to remove. However, the ease of removal may vary depending on the type of surface they were applied to and the adhesive used. It’s recommended to follow the manufacturer’s instructions for proper removal.
Question: Can stick-on tiles be applied over existing tiles?
Answer: In most cases, stick-on tiles can be applied over existing tiles. However, it’s important to ensure that the surface is clean, smooth, and free of any debris or loose tiles. It’s also recommended to prime the surface before applying the stick-on tiles for better adhesion.
Question: How long do stick-on tiles last?
Answer: The durability of stick-on tiles can vary depending on the quality of the tiles and the conditions they are exposed to. With proper installation and maintenance, stick-on tiles can last for several years. However, it’s important to note that they may not have the same longevity as traditional tiles.
]]>If you’re looking to update your bathroom without breaking the bank, painting the tiles can be a cost-effective and transformative solution. With a fresh coat of paint, you can give your bathroom a brand new look and create a space that reflects your personal style. In this guide, we will walk you through the process of painting bathroom tiles, from preparation to finishing touches. Get ready to transform your bathroom into a stylish oasis!
Why Paint Bathroom Tiles?
Painting bathroom tiles is a great way to refresh the look of your bathroom without the need for a full renovation. Whether you have outdated or worn-out tiles, or simply want to change the color scheme, painting allows you to achieve the desired look without the high cost and hassle of replacing the tiles altogether. It gives you the freedom to experiment with different colors and finishes, allowing you to personalize your space and make it truly unique.
Choosing the Right Paint
Before you begin painting, it’s important to choose the right type of paint for your bathroom tiles. Look for a paint that is specifically formulated for tile surfaces, as it will provide better adhesion and durability. Consider using a paint with a glossy or semi-gloss finish, as it will be more resistant to moisture and easier to clean.
Preparing the Tiles
Proper preparation is key to achieving a smooth and long-lasting paint finish. Start by thoroughly cleaning the tiles to remove any dirt, grime, or soap residue. Use a mild detergent and a scrub brush to scrub the tiles clean. Once the tiles are clean, rinse them thoroughly and allow them to dry completely.
Next, you’ll need to sand the tiles to create a rough surface that the paint can adhere to. Use fine-grit sandpaper to gently sand the tiles, being careful not to remove too much of the existing finish. After sanding, wipe away any dust with a damp cloth and let the tiles dry again.

Priming the Tiles
Priming is an important step that helps the paint adhere better to the tiles and ensures a more even finish. Apply a coat of tile primer using a brush or roller, following the manufacturer’s instructions. Allow the primer to dry completely before moving on to the next step.
Painting the Tiles
Now it’s time to paint! Choose a high-quality paint specifically formulated for tiles, and apply it evenly using a brush or roller. Start with the edges and corners, then move on to the larger areas. Apply multiple thin coats rather than one thick coat, allowing each coat to dry completely before applying the next. This will help prevent drips and ensure a smooth finish.

Finishing Touches
Once the paint has dried, you can apply a clear topcoat to protect the paint and add extra durability. A water-based polyurethane sealer is a good option for bathroom tiles, as it is resistant to moisture and easy to clean. Apply the sealer according to the manufacturer’s instructions, and allow it to dry completely before using the bathroom.
Finally, reattach any hardware or fixtures that were removed during the painting process, and give your newly painted tiles a thorough cleaning. Step back and admire your refreshed bathroom with its newly painted tiles!
FAQ: Painting Bathroom Tiles
Question: Can I paint any type of tiles?
Answer: While most types of tiles can be painted, it’s important to note that the success of the paint job will depend on the material and condition of the tiles. Ceramic, porcelain, and natural stone tiles are generally good candidates for painting. However, tiles that are heavily textured or have a glossy finish may require additional preparation and priming to ensure proper adhesion of the paint.
Question: How long will the painted tiles last?
Answer: With proper preparation and application, painted bathroom tiles can last for several years. However, it’s important to note that high-traffic areas, such as shower walls or floors, may require more frequent touch-ups or reapplication of the paint. Regular cleaning and maintenance will also help extend the lifespan of the painted tiles.
Question: Can I paint over existing tile patterns or designs?
Answer: Yes, you can paint over existing tile patterns or designs. In fact, painting can be a great way to update outdated or unappealing patterns. However, keep in mind that the existing pattern may show through the paint to some extent, especially if it is darker or has a strong contrast with the new paint color. It’s recommended to choose a paint color that will effectively cover the existing pattern.
Question: Can I use regular wall paint for bathroom tiles?
Answer: It is not recommended to use regular wall paint for bathroom tiles. Regular wall paint is not designed to withstand the moisture and frequent cleaning that bathroom tiles are exposed to. Using a paint specifically formulated for tile surfaces will ensure better adhesion, durability, and resistance to moisture and stains.
Question: Can I paint the grout between the tiles?
Answer: Yes, you can paint the grout between the tiles. However, keep in mind that the paint may wear off more quickly in high-traffic areas or areas that are frequently exposed to moisture. To ensure a longer-lasting finish, consider using a grout paint or sealer specifically designed for this purpose.
]]>If you’re looking to update your bathroom without breaking the bank, painting your tiles can be a great option. Not only does it provide a cost-effective solution, but it also allows you to unleash your creativity and transform your space into something truly unique. Here are some of the benefits of painting tiles in your bathroom:
- Affordability: Tiling can be an expensive endeavor, especially if you’re working with a limited budget. However, painting your tiles is a much more affordable alternative that can give you the same desired effect.
- Easy DIY Project: Painting tiles is a relatively simple DIY project that can be done by just about anyone. With the right tools and a little bit of patience, you can achieve professional-looking results.
- Endless Design Options: When you choose to paint your tiles, you’re not limited to the options available in the market. You can select any color or pattern that suits your taste and complements the overall aesthetic of your bathroom.
- Quick Transformation: If you’re tired of the current look of your bathroom and want a quick transformation, painting tiles is the way to go. It allows you to completely change the appearance of your tiles in a matter of hours.
- Protection and Durability: Painting your tiles can actually provide an extra layer of protection, making them more resistant to mold, mildew, and moisture. It can also help extend the lifespan of your tiles.

Steps to Paint Tiles in Your Bathroom
Now that you’re aware of the benefits, let’s dive into the step-by-step process of painting tiles in your bathroom:
Step 1: Prepare the Tiles
The first step is to ensure that the tiles are clean and free from any dirt, grime, or grease. Use a mild detergent and scrub the tiles with a sponge or brush. Rinse thoroughly and allow them to dry completely.
Step 2: Sand the Tiles
Next, lightly sand the tiles to create a rough surface that will help the paint adhere better. Use a fine-grit sandpaper and gently sand the tiles in a circular motion. Wipe away any dust or debris with a damp cloth.
Step 3: Apply Primer
Before applying the paint, it’s important to prime the tiles. This will ensure better adhesion and a smoother finish. Use a high-quality tile primer and apply it evenly using a paintbrush or roller. Allow the primer to dry according to the manufacturer’s instructions.
Step 4: Paint the Tiles
Once the primer is dry, it’s time to paint the tiles. Choose a high-quality tile paint in the color of your choice. Apply the paint using a paintbrush or roller, making sure to cover the tiles evenly. Allow the first coat to dry completely before applying a second coat if necessary.
Step 5: Seal the Tiles
To ensure the longevity of your painted tiles, it’s recommended to seal them with a clear tile sealer. This will provide an extra layer of protection and make the tiles easier to clean. Follow the manufacturer’s instructions for application and drying time.
Step 6: Enjoy Your Newly Painted Tiles
Once the sealer is dry, you can now enjoy your newly painted tiles. Step back and admire the transformation you’ve achieved without the need for a costly renovation.
FAQ: Painting Tiles in Your Bathroom
Question: Can you paint tiles in a bathroom with high moisture?
Answer: Yes, you can paint tiles in a bathroom with high moisture. However, it’s important to choose a paint that is specifically designed for high-moisture areas, such as a bathroom. These paints are formulated to resist mold and mildew and provide better durability in humid environments. Additionally, make sure to properly clean and prepare the tiles before painting to ensure proper adhesion.
Question: How long does the paint on bathroom tiles last?
Answer: The longevity of the paint on bathroom tiles will depend on various factors, including the quality of the paint, the preparation of the tiles, and the level of wear and tear in the bathroom. On average, a well-painted and properly maintained bathroom tile can last anywhere from 5 to 10 years. Regular cleaning and avoiding harsh chemicals can help prolong the life of the paint.
Question: Can I paint over existing tile grout?
Answer: While it is possible to paint over existing tile grout, it is not recommended. The grout is a porous material that can absorb the paint, causing it to fade or discolor over time. It’s best to clean and refresh the grout separately using a grout pen or a specialized grout paint to achieve a consistent and long-lasting result.
Question: Can I repaint my painted bathroom tiles?
Answer: Yes, you can repaint your painted bathroom tiles. Over time, if you wish to change the color or refresh the look of your tiles, you can follow the same process of cleaning, sanding, priming, and painting. However, make sure to properly prepare the tiles and remove any loose or chipping paint before applying a new coat.
Question: Can I paint over textured bathroom tiles?
Answer: Yes, you can paint over textured bathroom tiles. However, it’s important to note that painting textured tiles may require additional coats of paint to ensure full coverage. It’s also recommended to use a paintbrush rather than a roller to get into the crevices and ensure even application. Take your time and be patient to achieve the desired result.
]]>The Benefits of Stick-On Tiles for Bathrooms
1. Easy Installation: Stick-on tiles are incredibly easy to install. You can simply peel off the backing and stick them onto any clean and smooth surface. This eliminates the need for messy adhesives or grout.
2. Cost-Effective: Renovating a bathroom can be a costly endeavor. Stick-on tiles offer a budget-friendly alternative that can help you achieve the look you desire without breaking the bank.
3. Versatility: Stick-on tiles come in a wide range of colors, patterns, and designs, allowing you to customize your bathroom according to your personal style and preferences.
4. Durability: Despite their lightweight and adhesive nature, stick-on tiles are designed to withstand moisture and daily wear and tear. They are waterproof and resistant to mold and mildew, making them a perfect choice for bathrooms.
5. Temporary Solution: If you’re renting a property or simply want to try out a new look, stick-on tiles offer a temporary solution that can be easily removed without causing damage to the underlying surface.
Choosing the Right Stick-On Tiles
When selecting stick-on tiles for your bathroom, it’s important to consider a few factors:
- Size: Measure the area you plan to cover and choose tiles that are the right size to ensure a seamless installation.
- Material: Stick-on tiles are available in various materials such as vinyl, glass, or metal. Consider the durability and maintenance requirements of each material before making a decision.
- Style: Think about the overall aesthetic you want to achieve in your bathroom. Whether you prefer a classic, modern, or eclectic look, there are stick-on tiles available to suit every style.
Installation Tips
Follow these tips for a successful stick-on tile installation:
- Clean the surface thoroughly before applying the tiles to ensure proper adhesion.
- Start with a corner or edge and gradually work your way across the wall or floor.
- Use a level to ensure the tiles are applied straight and evenly.
- Trim the tiles as needed to fit around fixtures or corners using a utility knife or scissors.
- Apply firm pressure to ensure the tiles adhere securely to the surface.
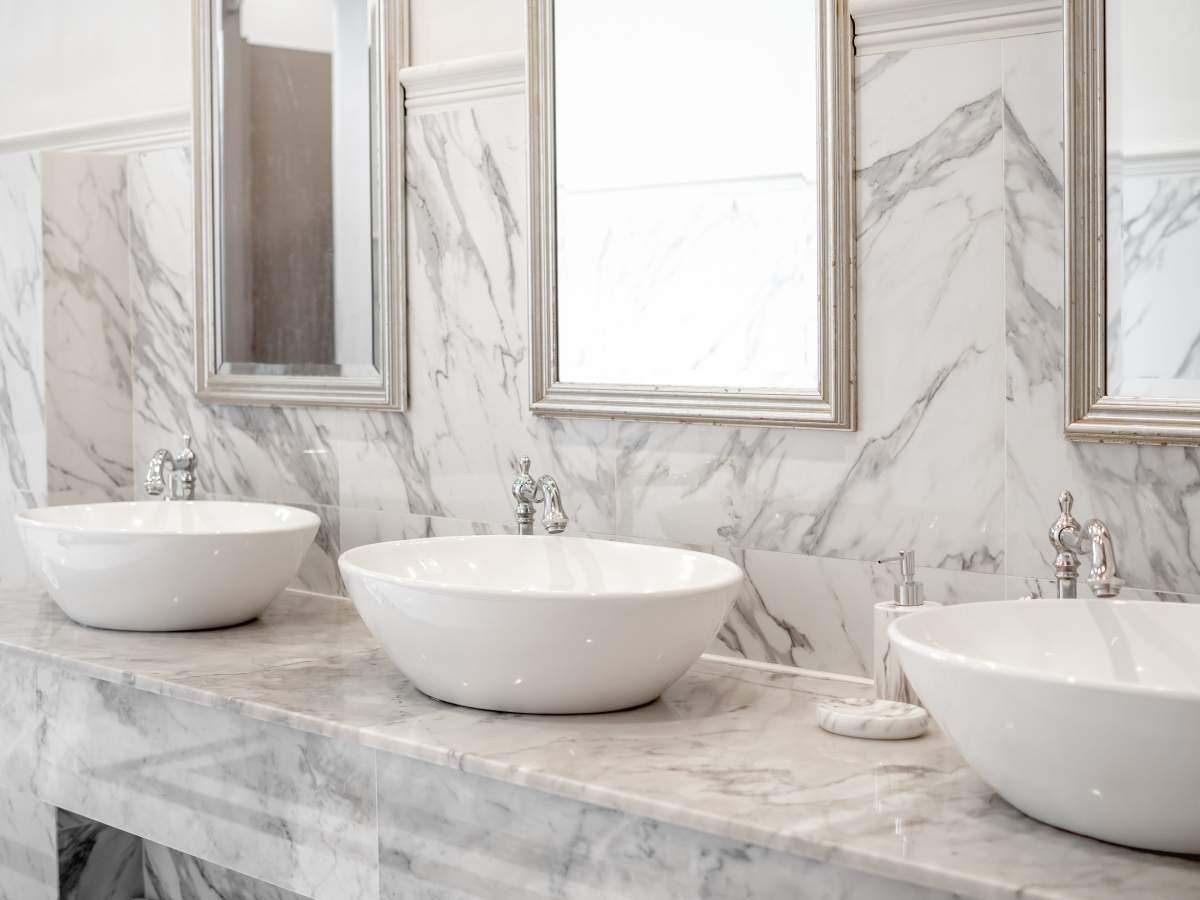
Stick-On Tiles for a Luxurious Look
If you’re aiming to create a luxurious bathroom, stick-on tiles can help you achieve that desired aesthetic. Opt for marble-inspired stick-on tiles to add a touch of elegance and sophistication to your space. The white marble design shown in the image below creates a timeless and luxurious ambiance that can elevate the overall look of your bathroom.
Stick-On Tiles for Bathroom Floors
Stick-on tiles are not limited to walls; they can also be used to update your bathroom floor. Whether you have outdated linoleum or worn-out tiles, stick-on floor tiles can instantly transform the look of your bathroom. Choose a design that complements your overall bathroom theme and enjoy a brand new floor without the hassle of traditional tile installation.
FAQs about Stick-On Tiles for Bathrooms
Question: Can stick-on tiles be used in wet areas such as showers?
Answer: Yes, stick-on tiles are designed to be water-resistant and can be used in wet areas such as showers. However, it’s important to ensure proper installation and maintenance to prevent water from seeping behind the tiles.
Question: How long do stick-on tiles last in a bathroom?
Answer: The lifespan of stick-on tiles in a bathroom can vary depending on factors such as the quality of the tiles and the level of moisture in the room. With proper installation and maintenance, stick-on tiles can last for several years.
Question: Can stick-on tiles be removed without damaging the underlying surface?
Answer: Yes, stick-on tiles can be easily removed without causing damage to the underlying surface. However, it’s important to follow the manufacturer’s instructions for removal to avoid any potential damage.
Question: Are stick-on tiles suitable for uneven surfaces?
Answer: Stick-on tiles are best suited for smooth and even surfaces. If your bathroom has uneven walls or floors, it’s recommended to address the unevenness before installing stick-on tiles to ensure a proper and long-lasting installation.
Question: Can stick-on tiles be installed over existing tiles?
Answer: Yes, stick-on tiles can be installed over existing tiles. However, it’s important to thoroughly clean and prepare the surface before installation to ensure proper adhesion.
]]>Upgrade Your Bathroom with Self-Adhesive Wall Tiles: A Step-by-Step Guide
Welcome to our blog where we share tips and ideas on interior design, decoration, and bathroom renovations. In this article, we will guide you through the process of upgrading your bathroom using self-adhesive wall tiles. Whether you are looking to refresh the look of your bathroom or add a new touch of style, self-adhesive wall tiles can be a great option. They are easy to install, affordable, and offer endless design possibilities. Let’s dive into the step-by-step guide to transform your bathroom into a stylish and inviting space.
Step 1: Planning and Preparation
Before you begin the installation process, it is important to plan and prepare your bathroom. Start by measuring the area you want to cover with self-adhesive wall tiles. This will help you determine the quantity of tiles you will need. Consider the overall style and color scheme of your bathroom and choose self-adhesive tiles that complement the existing decor.
Next, thoroughly clean the walls to ensure a smooth surface for the tiles to adhere to. Remove any dirt, grease, or old wallpaper. Sand down any rough patches and fill in any holes or cracks with putty. Once the walls are clean and smooth, wipe them down with a damp cloth to remove any dust or residue.
Step 2: Tile Layout
Before applying the self-adhesive wall tiles, it is essential to plan the layout. Lay out the tiles on the floor or a large table to visualize how they will look on the wall. This will help you make any necessary adjustments and ensure a seamless and balanced design.
Step 3: Applying the Self-Adhesive Tiles
Start by peeling off the protective backing from the first self-adhesive wall tile. Align the tile with your layout plan and press it firmly onto the wall, starting from the bottom and working your way up. Use a level to ensure the tiles are straight and even. Repeat this process for each tile, leaving a small gap between each one for grout.
For corners or edges, you may need to cut the self-adhesive tiles to fit. Measure the area and use a utility knife or scissors to make precise cuts. Take your time to ensure accurate measurements and clean cuts for a professional finish.
Step 4: Grouting
Once all the self-adhesive wall tiles are in place, it’s time to grout. Choose a grout color that complements the tiles and mix it according to the manufacturer’s instructions. Apply the grout using a grout float, pressing it firmly into the gaps between the tiles. Remove any excess grout with a damp sponge, being careful not to remove too much grout from the gaps. Allow the grout to dry for the recommended time.
Step 5: Finishing Touches
After the grout is fully dry, take a step back and admire your newly upgraded bathroom. Clean the tiles with a mild detergent and a soft cloth to remove any grout haze or residue. Consider adding some decorative elements such as a new mirror, shelves, or plants to enhance the overall look and feel of the space.
Image 1
By following this step-by-step guide, you can easily upgrade your bathroom with self-adhesive wall tiles. Enjoy the process of transforming your bathroom into a stylish and inviting space. Self-adhesive wall tiles offer a convenient and cost-effective solution for adding a touch of elegance to any bathroom. Get creative with different tile patterns and designs to personalize your space and make it truly your own.
FAQ: Bathroom Tiles
Question 1: Can self-adhesive bathroom wall tiles be installed over existing tiles?
Answer 1: Yes, self-adhesive bathroom wall tiles can be installed over existing tiles. However, it is important to ensure that the existing tiles are clean, level, and in good condition. Remove any loose or damaged tiles before applying the self-adhesive tiles. It is also recommended to use a primer or adhesive promoter to improve the adhesion of the self-adhesive tiles to the existing tiles.
Question 2: How long do self-adhesive bathroom wall tiles last?
Answer 2: The durability of self-adhesive bathroom wall tiles can vary depending on the quality of the tiles and the installation process. Generally, high-quality self-adhesive tiles can last for several years with proper care and maintenance. Avoid using abrasive cleaners or scrub brushes that can damage the tiles. Regularly clean the tiles with a mild detergent and a soft cloth to keep them looking their best.
Question 3: Can self-adhesive bathroom wall tiles be removed without damaging the walls?
Answer 3: Yes, self-adhesive bathroom wall tiles can be removed without damaging the walls. Start by heating the tiles with a hairdryer to soften the adhesive. Use a putty knife or a similar tool to gently pry the tiles off the wall. If there is any adhesive residue left on the walls, you can use a commercial adhesive remover or a mixture of warm water and dish soap to clean it off. It is always recommended to test the adhesive remover on a small, inconspicuous area of the wall first.
]]>